Monday, January 31, 2011

Stars All Over My Wall


This is my design wall for today.  Lots of stars.  The big blocks are 12 inches and the little guys are five inchers.  I finally finished one of the blocks for the 2011 BOM -- it's the one in the center of the top row.  I know it probably has lots of names, but here it's called "Old Maid's Puzzle."  The other blocks for this month were the "Ohio Star,"  "Churn Dash," and a variation of "Churn Dash."  I doubt that I will do any of them because there are others that I'd rather do.

To see everybody else's design walls, click over to Judy's blog, here.


Tomorrow or the next day, I will post a tutorial about how to machine piece a Lemoyne star -- assuming we still have power.  We're at the top edge of the predicted blizzard path.  I hope everyone stays safe.. 

Wednesday, January 26, 2011

Art From the Heart


Art from the Heart is a new artistic endeavor devoted to showcasing art dedicated to changing the course of our world.  Art that is designed to "bring attention to the growing problems of hatred and violence in the United States, as well as the need for peace and nonviolence on the planet" is the focus of this online exhibit.


I am delighted to announce that my piece, "One World, One Heart, No Hate" has been chosen to be part of this exhibit. 


This is a detail of "One World, One Heart, No Hate"


I painted the earth on cotton with acrylic paints.  


I cut it out, cut it in half, and fused it to a heart cut out of some of my shibori-dyed fabric.


Of course, the best part is near the middle of the piece.


I created the wings from cotton with batting.  


The background is some commercial fabric I had that looks like a starry night sky to me. 

For a look at the entire piece with my statement, you'll have to click here to go to Art from the Heart.

Monday, January 24, 2011

Starry Monday

This is my design wall today.  I'm working on samples and a handout for the Lemoyne star class next month.  I haven't finished any of the blocks for last month.  Ok -- I haven't even started any of them.  Too busy...

To check out other design walls, click here to go to Judy's blog.

Friday, January 21, 2011

First Snow Dyes of the Season

We've had lots of snow this winter, but I've been way too busy to do much dyeing with it.  And then, I do still have a bit left from last year...


I was going for a natural woodsy-lost-in-the-forest look and chose my dyes accordingly.

 I measured wrong and after all of these were done with the dyeing and the washing and the drying, they were all a little bit short of a yard.  Each one measures 35 to 35 and a half inches by 42.
I used sky blue, cerulean blue, navy, lemon yellow, golden yellow, and brown.


The thing I like best about these is that they all have the colors in this month's Color Palette Challenge over at Three Creative Studios.  I'd like to say that was intentional, but I'll come clean and admit it -- it's a happy accident.


This last one is my favorite. It's the one I'm keeping.   I'm not sure what I'll do with it yet.  

It reminds me of scary woods and Hansel and Gretel.  Maybe it needs a few breadcrumbs?


Tuesday, January 18, 2011

Potatoes On Fabric

Instead of on my hips.  I have been working on this for a couple of weeks.  I finally had some success and now feel that I can share the failures since I understand what went wrong.

These are the successes. I have long admired the look of fabric dyed with potato dextrin resist.  I purchased some potato dextrin a while ago, but I hadn't tried it.  My first attempts were disasters.  I used the (rather expensive) potato dextrin that I purchased online and the recipe from Ann Johnston (here).
The left side (black) is the first try that worked, the blue is the second pass.
(Ignore the black blobs in the middle and along the edge of the first side.)

This was with the old dyes and gooey potato starch resist
However, I used my power whisk to mix it up and had a gluey mess that I spread on the fabric.  It didn't crack so that the dye could get into the little spaces and make the wonderful lined patterns.

The reason it didn't work is cooking 101 (or maybe 201).  Potato starch molecules are encased in stuff like little pillows and if you beat the potatoes too hard (like with a power mixer), you break up the little pillows and end up with a gluey mess.  Sometimes you get a sticky mess instead of fluffy mashed potatoes; this stuff works the same way.

So I went to the store and purchased two boxes of instant potato flakes.  I bought the (much cheaper) store brand and a box of a national brand.  They are pretty much identical for this purpose.  The only difference I could find was that the cheaper stuff didn't have the fancy inner liner.  Big deal...not.

I mixed it up sort of following the recipe in Complex Cloth by Jane Dunnewold.  I did make some changes, so I'm going to include my recipe at the end.  Then I let it cool and spread it on the fabric (I reused the same fabric I had used for the first couple of experiments).  I let it dry.
This is what the starch looks like after it has been dried and distressed.

No, I didn't stretch it out -- in fact, I got much quicker results by draping it over some empty plastic lettuce boxes.  It didn't need to be flat because I was going to roll and flatten it so the starch would break up and allow space for the dye to seep in.

Too much thickened dye -- looks like a tar pit.
The result of too much dye -- blobs!
I mixed up some dye thickener and added fresh dyes and soda ash (dye activator).  The first round, I used some very old dyes and the marks were very light.  Unfortunately, for this round, I had more dye mixed up than I needed and because I added some dye activator to the thickened dye, I had to use it up.  So I globbed it on the fabric.  --Not crazy about the blobby result.

Thin layer of starch with dye painted over
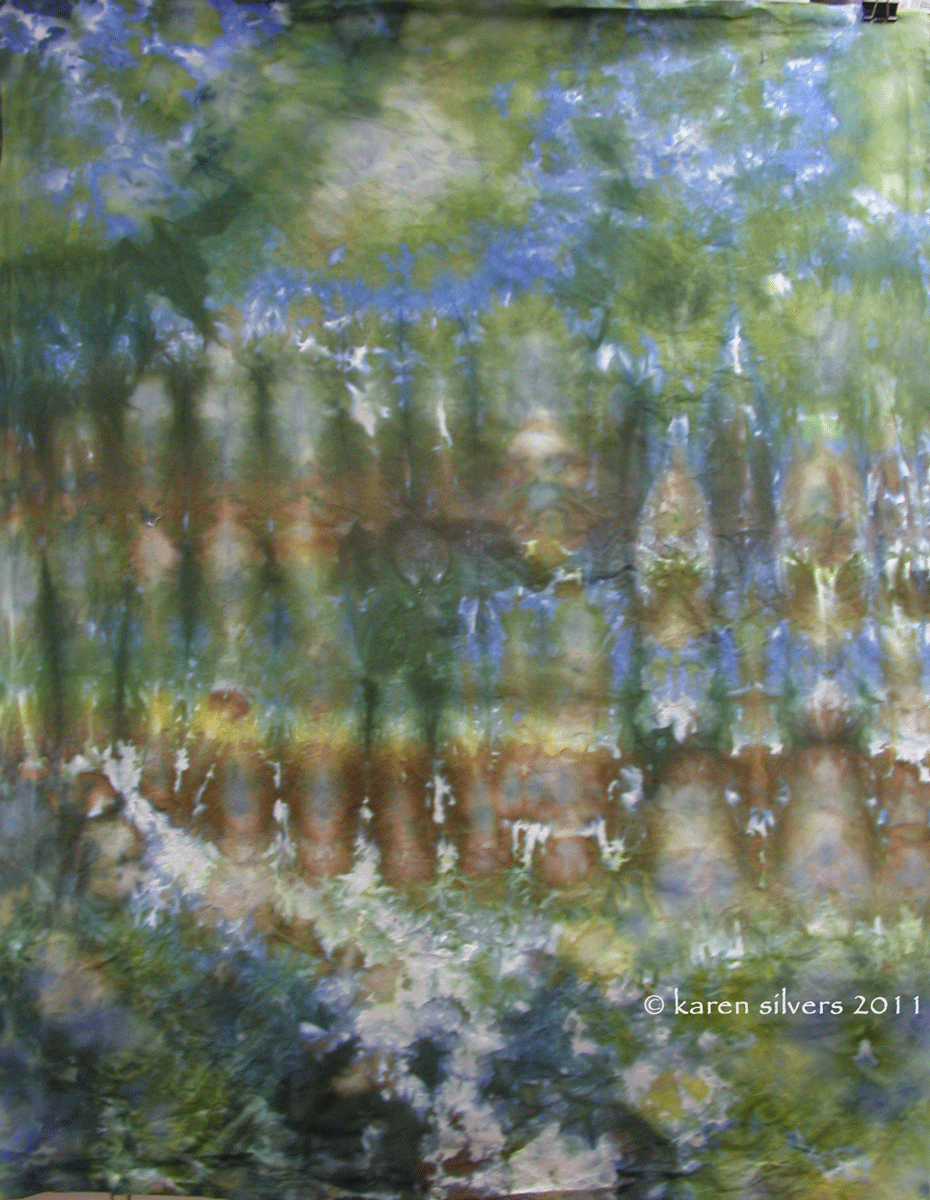
The last time, I mixed up some more of the potato starch and spread it very thinly.  I let it dry, then rolled and crushed the fabric to distress the starch resist.  Then I brushed on a thin layer of thickened dye.  It seeped through the little cracks and gave me the gorgeous results at the top of this post.


I let it batch, then soaked it in a bucket of warm water for a couple of hours to dissolve the potato.  I did have to scrunch and swish it a bit to get rid of the starch.  Then I washed it as usual for hand-dyed fabric.

This bottom photo is the back of the fabric after I spread the dye over the potato starch.

I have left the photos fairly large, so click on them to examine them more closely.


Potato-starch Resist (adapted from Complex Cloth)
This recipe can be doubled or quadrupled.  I was able to cover about half a yard of fabric with this amount.
2 3/4 cups water
1 cup instant mashed potato flakes
1 1/2 Tablespoons of liquid starch (the stuff in the laundry section of the grocery store)

Bring the water to boil in a large saucepan.  Add the potato flakes and turn heat down to medium or low.  Cook, stirring by hand with a large spoon, for 5 minutes.  Remove from heat, transfer from your kitchen pot to a small bucket (I use paint containers from my local hardware store).  Return your pot and spoon to the kitchen.  Add liquid starch to the bucket, stirring by hand with a large whisk (do NOT use this whisk in your kitchen anymore after it's been used for art work).  The mixture should be very smooth.  Let the mixture cool, then spread it on the fabric.  I put a piece of plastic wrap on the potatoes while they cool so that they don't dry out and get crusty on top.  I used wide plastic putty knives to spread the starch.  The thinner the layer of resist, the finer the network of lines you will get with the dye.

If there is interest -- I can discuss the process and use of thickened dyes sometime.

Oh -- and for dinner, I use a ricer to mash my potatoes (and garlic) after they're boiled; then I use a hand whisk to fluff them.  Add some hot milk or sour cream and perfection!  Light, fluffy mashed potatoes.  Mmmmm.

An Award? For Me?

Yes -- Carolyn at Vegetarian Hunter has nominated me for this award.  It is an award for the smaller blogs -- fewer than 300 followers -- and a way to share information about us little guys.
The best part is that I get to pass it on to three to five of my bloggy friends.  I have picked three.


First, I'd like to nominate Beth of Notes.  Beth is an American quilter who lives in South Africa.  She blogs about quilts and life in her new place.  Beth also takes absolutely awesome photos of African flora and fauna.  She is exceedingly knowledgeable about the subjects of her pictures and writes the most interesting blog.


My second nominee is Sara at The Universe According to Sara.  Sara was the most neglectful blogger until recently.  She writes about quilts, beading, and other creative projects with the occasional rant about other topics.  Recently, she decided to make the effort to update her blog regularly, and in doing so, has blossomed as a  blogger.  Although I suspect she would dispute it, Sara is very creative.


My third nominee is Karen at Rabbits Eat Quilts.  The title alone is worth a visit.  But Karen writes about her family, including those rabbits, and her experiments with art quilting.  Karen is a thread-sketcher extraordinaire and she makes some amazing art quilts.


I am not in the habit of accepting blog awards, but Carolyn said such nice things about me and now I get to say nice things about my friends, that I decided to graciously accept this and pass it on.


Monday, January 17, 2011

Changes to the Design Wall

I took down the green/blue quilt (OK -- it fell down) and put up the stuff from the 2011 BOM group.  I'm working on a tutorial for the lemoyne star blocks because I'll be teaching them next month.  The other blocks are from the book, but they haven't been demoed by anyone yet.  I just made them because they looked like fun.

And here is a last picture of the green/blue quilt for a while as it awaits further cogitation about the next set of borders.  It has grown to about 80 inches and is tacked up on the right side where it extends beyond the design wall.  That's my only studio window up at the top right.  I thought the window well was clean, but there are more spiderwebs growing in there since the last uncharacteristic flurry of cleanliness.  Sheesh.

To see what other people have going on their design walls, check out Judy's blog here.

Saturday, January 15, 2011

Turning Point is Up!

Yesterday, we finished hanging the Madison Contemporary Fiber Artists' show, Turning Point, at the Overture Center in Madison, Wisconsin.

Here is the blank canvas before we started.  This is Gallery 1 -- on the main floor of the Overture Center.
Here are the pieces all laid out on sheets on the floor.


And the finished show:


I left the photos large -- click on them for a closer view.  I'll probably post more about this with more pictures in the near future.

This show will be on display through April 3, 2011.  There is an opening reception next Friday, January 21, 2011.

Mag 48

In staccato light
that the sun throws
through the blinds
I face your music
Your voice ricochets
in accusation's gloom
unspoken words form
a conga line from
you to me.
Like a twisting black mamba
we dance our mambo
one foot out
and then the other.

-kls 2011


This poem was written in response to the picture above which is courtesy of Magpie Tales.  Write your own and link here to share with the gang.

For more information on black mambas -- look here.  

Tuesday, January 11, 2011

January Journal Quilt

"Repeat Eyes Her Dinner"
8 x 12 inches

This is my first completed Journal Quilt for 2011.  My personal challenge was to use some of my shibori-dyed fabric.  

So I used the stuff with the little moons because geckos are nocturnal.  

I stenciled little gecko shapes with freezer paper templates and sponged the paint onto the fabric.  It's pretty subtle.  Not what I intended, but after it dried, I liked the "ghost-gecko" look.  I left the pictures pretty large, so you can click on them for a better look.

The gecko and cricket are raw-edge appliquéd with textile paint and thread to enhance them.  

I chose the leopard fabric for her top side because she is a leopard gecko.

The sand is more paint and thread.


What would I do different? Another of my self-imposed rules was to make each journal quilt 8.5 by 11 inches.  I chose this size because it's large enough to really try a technique -- but not so big that I won't have time to finish.  This one missed that rule -- and actually, I think it looks unbalanced.  I think it needs another border on the side.  

I had wanted the gecko to dominate the quilt, but with the top and bottom borders, it just doesn't work for me.  I think I could have done without the borders and made the gecko larger, but then I wouldn't have used the shibori.  So maybe I need to make another one...


Monday, January 10, 2011

Eeek! It's Outgrown the Design Wall!

Yep -- the blue/green quilt has officially outgrown my design wall.  So far, it's about 80 inches square.  The good news is that I've finished sewing together the inner borders and I'm ready to stitch up the setting triangles.

I'm using this fabric.  It's very subtle -- but I soaked the white on white fabric in water with a drop of blue textile paint dissolved in it.  I heat set it and there is very little patterning -- the paint was just too dilute for that, but it has a slight blue cast.  To see other design walls, take a hop over to Judy's blog here.

In other news -- I received a CQ 4x4 in the mail Saturday.  This is Gracie's work.  It's sitting on a wonderful piece of chicken fabric that she also sent along.

And I don't think I published a photo of this here, even though I received it a while ago.  This is Jean's work.  And a fabulous piece of hand-dye that she enclosed with it.

Saturday, January 8, 2011

Playing with Inks

I did a little more work on this portrait of my daughter.  I think it's ready for the background.

I've been playing around with different techniques and got out the Ink Potion #9 -- it's made by Tsukineko, the same company that makes the inks and the Fantastix.  This stuff is used to dilute the ink and make it spread better.  I used a bit to dilute the inks -- but it makes them watery and so I had to be much more careful before using them on my piece.  I think I should have tried using a brush -- the Fantastix-thingies didn't work so well.  You can see the brown blobs  -- those are either 54 Chocolate or 55 Truffle.

Another method is to mix them with aloe vera gel.  I've done this before, but when you mix up some color, you have to mix up enough for the whole thing and use it right away.  Otherwise, it dries out and it's too hard to mix up more of the same color.   But my friend, Jill, over at Quilt Rat, suggested another technique.  Paint the aloe on the fabric first, then go over it with the inks, using a brush to apply them.  She blogs about it here.  I did a sampler and painted the inks on with brushes.  I like the thin, wet coat of gel best for blending.  I've left the photos large, so to see them closer, click on the photo.

These inks need to be heat set and I will do that before I do the background.  The thing I don't get is why they don't blend at all after they've dried, but they rinse right out if they're not heat set.

Monday, January 3, 2011

Mag46 -- A New Year


Defrocked Christmas trees
grace dirty snow
awaiting gloved men
with noisy chippers

Mere days in --
gloves already off
resolutions chipped and worn
shine and ornamentation gone

Chipped trees segue to mulch
in a garden layer below
the snow, holding warmth
concealing new growth

 -kls 2011

This was written in response to the picture above, which is courtesy of Magpie Tales.  Write your own and link here to share with the rest of the gang.

I took some pictures of trees today --

 I played around a little with these in PhotoShop.
It always makes me sad to see them tossed onto a snow bank --