Wednesday, June 30, 2010

June Ends and the Robins Leave the Nest


The first two hatched.


Then there were four -- this was about a week after they hatched.  They've grown feathers.


Even the father (who apparently went on vacation during the whole nest building and sitting period) helps feed the hungry horde.  Those two parents had a constant relay bringing wormy tidbits to the babies.


They didn't like me and my camera much.


Things got pretty crowded in there.


Before dinner one night, I found this one drunkenly hopping around on the porch.  He/she kept flopping over.


After dinner (mine) they were all back in the nest, so I went back inside to help clean up.


When I came back out, they were gone. Sniff, they grow up so fast.

Sunday, June 20, 2010

Don't You Just Love

starting a new project?

I love this face!


I have a challenge in which I must use this fabric:


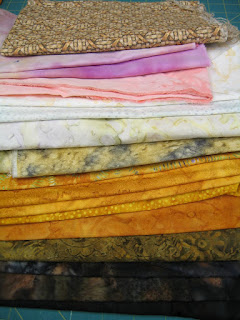
I have pulled these fabrics from my stash:


And I have a roadmap:


Time to get mooing (whoops -- sorry, I just couldn't resist).  More later.

Friday, June 18, 2010

Only the Good


Grandma’s dish drops, splits into shards
Sharp as the knife slipped into holiday roast
Sharp reminder every morning since
Mother’s passing.  Not immediately upon
awakening, but as soon 
as cognition sets in – 
they’re gone now.  
And their friends.  
Leaving us:  their children and
(surprisingly) their men 
to fend
without the wisdom from the portal
through which our lives began 
and will eventually end.

After the first year’s markers, the knife always dulls.
Only stories left of a young Uncle shot down
over France.  He sent those plates
before I was born.  And left nothing 
but shards.

-kls 2010


This was written in response to the picture above from Magpie Tales.  Write your own and click here to leave a link.

Thursday, June 17, 2010

"Bamboo Tiger" Wins a Ribbon at NQA Quilt Show!


My little quilt, "Bamboo Tiger" won a second place ribbon in the art quilt division at the National Quilting Association show in Columbus, Ohio!  


Thanks to Judi of Judi's Crazy World and her husband who took the pictures for me.  Judi is vending her fabulous hand-dyes at the show -- so stop by, shop, and say "hi" for me.

I'm On Quilter Blogs

They requested that I link back to them and here it is:


QB2

There is also a button over on the sidebar.  There are lots of different kinds of quilter blogs at this site and it's updated as we post to our blogs.  

Tuesday, June 15, 2010

Yikes! Tiny A-Word Circles

So I wrote this post and when I went to add the pictures, they were just horrible.  I couldn't do anything with them except throw them in the recycle bin.

If you want this information, go look at this tutorial here and see what my pictures should have looked like.   I make those little circles the same way,  but this was written by a different Karen.  I'm leaving the info here but making it very tiny because I just can't bear to erase it all. Enjoy the pics that did turn out and learn from someone else's blog.  Sigh....


I used a traditional method to make those tiny little circles.  Any way you look at them, they're a pain to do well, so it's best to just heave a sigh and do it.


I cut a circle out of template plastic -- if I had been on my game, I would have gone out to the "Dyeing Studio" (AKA the north east corner of the garage) and found the nylon washers I use for sunprinting and used them.  But the car was in the way, and the bikes, and gardening junk, and, well, you get the picture.  So I just used the template I made.
I placed it on the wrong side of the fabric and drew around it with my beloved Bohin pencil.  I cut, leaving a scant 1/4 inch.  I ran a line of thread using a running stitch, then placed the template on the fabric and drew up the thread.
Sprayed it lightly with starch and pressed it.  It has to sit until it is cool and dry.  If it's not cool and dry, the shape will be out of round after you remove the template.  Trust me, I know this.  After it's cool and dry, gently pull the template out, gently pull up the thread until it's round again, and hit it again with the hot iron.


Viola! A perfectly round shape that's easy to stitch down.


Oh, and just trim off that thread.  You don't need it any more.


Soon: new stuff -- I promise!

Monday, June 14, 2010

Shameless Promotion for Personal Gain

My friend Anne at El Milagro Studio is having a giveaway to celebrate "100 and Counting."


  She's giving away not one, but two fabulous pieces of her artwork and I want one!


So click here  or go to the link on the side bar to go on over there and leave a comment -- make sure you let her know that I sent ya!

Saturday, June 12, 2010

More About the Dreaded "A" Word


For accurate placement on the background fabric, I cut my background fabric a half inch larger all the way around.  For example, these blocks finish at 12 inches, so a 12 and a half inch square is cut.  I cut mine at 13 and a half because the appliqué does draw it up a bit.  So after it's done, I can cut it down to an accurate 12 and a half inch square.


I iron it in half, turn it, and iron another crease so I have a four squares ironed into my fabric.  Then, I iron creases from corner to corner.  This gives me a guide for placement of the appliqué pieces.

You may have noticed that all my leaves aren't perfectly symmetrical and they're all different fabrics.  I like the organic look -- no two leaves are ever the same in real life either.  And I'm relieved from having to make 12 exactly perfectly matching leaves.

I traced the design from the pattern onto baking parchment.  I line it up with the ironed-in creases, then place my pieces with tweezers.  I have these nifty little appliqué pins to hold them in place while I stitch.  They're nice because they're so tiny, the thread doesn't catch them when I'm sewing.

I use a small needle and thread that matches the appliqué, not the background.  I bury the knot under the appliqué, then do a blind stitch catching the fold of the appliqué.

To make the stems, I have this cool little pen.  It has a "magic" potion in it (don't know what it is but I really hope it's not something that will make my quilt rot in 20 years).

I cut the bias strip -- the finished piece was a little larger than a quarter inch, so I cut them at 3/4 of an inch.

Then I put my ruler down, leaving a scant quarter inch and "marked" it with the pen.  The liquid makes it easy to fold, then press with a hot iron.  I turned it and did the other side.

This pen is also useful for turning edges on labels, or anything else.  The wet line turns really easily. And I can make bias strips any size -- I'm not limited to the sizes the strip-makers make.

Next:  Those *&#@;$!!! little circles.

Friday, June 11, 2010

What's Underneath


A forest of possibilities
Sharp and pointed as thoughts
That lurk just beneath
The smooth veneer in lots
Paved by the ragged tires
Of broken down cars
And crowned by a memory
Of what might have been

                       -kls


This is a poem written in response to a prompt from Magpie Tales.  Click here to see what others are doing and to leave a link to your own.

Saturday, June 5, 2010

Eeeek! It's the "A" Word!

I like hand work.  Before my daughter was hijacked by the evil forces of Hanna Montana and Company, she wore beautiful hand-smocked dresses that I made for her.  I knew from the start that it was a limited-time offer.  But I loved making those dresses.

I had assumed I would take up knitting when the dresses ended, but I seem to have the knitter's equivalent of two left feet -- two left thumbs.  I like bead-work, but it's difficult to do it in my seat on the couch.  The beads keep spilling.  And the light's not really right.  And, unlike smocking, I have to really concentrate.  So I miss plays.  Football plays, that is.

So I read a lot.  But I'm still missing those plays.  I need some kind of hand-needlework.  I do like embroidery, but it requires more concentration than I'm willing to give it right now.  And hand-quilting is more intense than I'm ever going to get.  Besides, I like quilting on my machine.  That leaves...yep...appliqué.

My hand has some temporary issues, so the needle-turn thing isn't happening right now.  I need a method that makes all the pieces ready to stitch down without a whole lot of finagling.  Quilt Rat mentioned here a technique using dryer sheets that intrigued me.  A lady in the group that is doing this pattern said she uses dryer sheets for hand-appliqué all the time.  And she does a LOT of appliqué.


So I bought a box and used them in the laundry instead of the liquid stuff.  (I would make a joke here about "marking" my territory -- my DH, that is-- but I mark mine with tiny scraps and threads).

I have to say -- these dryer things stink!  They make my eyes water.  So I found a box without all that stench (uh huh, I sniffed 'em whilst I was in the store) and got together a stash of the used sheets.  I know that I'm a little behind the curve on these things -- there are people dyeing and painting them and doing all sorts of fabulous things with them, but since I wasn't using them in my laundry, I wasn't in the loop.

Well, all that has changed now.  They work really well for turning the edges, so all the shapes need is a little stitch around the edge.  The final stitching could even be done quite easily on the machine.

First, trace the shapes on the used dryer sheet.  I used a fine-point sharpie, but I didn't like that I could see the black line after they were turned.  Next time I will probably use a micron pen in a color that is closer to the fabric.  I'm not crazy about using Sharpies on fabric anyway -- they don't have archival ink and who knows what time bombs they introduce.

Then cut out the shape roughly -- make sure that there is at least a quarter inch or so around it -- and pin it to the right side of the appliqué fabric.

Stitch around the shape using a regular stitch and thread that is either neutral or matches the appliqué fabric.  Any areas that will be covered by other appliqué shapes should be left unstitched -- like the base of the leaf that will be covered by the stem. That way it's less bulky under the part that covers it.  Cut around the stitched shape leaving a scant quarter inch -- I left more like a fat 1/8th inch.  Clip corners and points.  Snip curves and inside corners right up to the stitching -- but try to avoid cutting through the stitching.

Slit a hole in the dryer sheet and carefully turn the shape.  It's helpful to have a turner of some type (I got mine at a shop that went out of business, sigh).  Press it, rolling the edge under with your finger so the dryer sheet is no longer visible on the top.

I traced the pattern onto a piece of parchment and, using tweezers, placed the pieces on the fabric using the parchment on top as a guide.  Then I hand stitched them down with thread that matched the appliqué fabric, not the background fabric.


Any of these pictures can be clicked on for a closer view.


Next:  more tips on placing the pieces on the background and the very cool new tool I discovered for making turned bias strips.  Hint:  it's not a bias strip maker...

Thursday, June 3, 2010

Hearts and Flowers


"Flower Wreath"
This is my interpretation


These are the ones that were done for today by members of the group (yep, that's mine in the middle on top).


"Heart of My Hearts"
This is my interpretation


These are from the pattern here and I thought I would include shots of the blocks that everybody made.  They look so pretty together.  This is the fun of doing a project with a group like this -- you get to see a whole bunch of different interpretations.

Next:  how I did it; or: don't fear the "A" word.

Wednesday, June 2, 2010

ATCs in the Mail and Barb's Giveaway

I belong to a Yahoo group, "M and M Art Friends," where I mostly lurk. It's a pretty eclectic group and I pull lots of inspiration from the various members.  Recently, I delurked and participated in an ATC swap and here are the beauties I received.


"Bird Art" by Karen L., (untitled) by Susan C


(untitled) by Christine R, "Happiness" by Mary F


(untitled) by Sue in South Africa, "Enjoy Nature" by April W


"May" by Karen L., (untitled) by Betsy B


"Grow" by Linda B, "peace" by Kirsten V


"Woodburnt Luna by La, "Namaste" by Jennifer E


(untitled) by Joyce, "Flower Collage" by Esmeralda S.


(untitled) by Diane C, (untitled) by Elle P


"Journey" by Becky A, (untitled) by Barbara M


"Serendipity" by Jan B


"Lilac" by Kathleen C, "Purple Palooza" by Pam P


(untitled) by Denise F, (untitled) by Bonny W


"Happiness" by Susan G, (untitled) by Jennifer L


These are all amazing works of art.  I would be hard pressed to pick a favorite!  Thank you all!

Barb over at Bejeweled Quilts is hosting an Accuquilt givaway.  If you want one of these cool toys, go over there and leave a comment and tell her that I sent you.  She has a link to Accuquilt and you can pick out some dies to go with your new toy.  Fun, fun, fun.