Wednesday, December 26, 2012
Sunday, December 9, 2012
Lemonade with Limes
So my attention was drawn to this cool little tutorial by Jane LaFazio (here) and I decided to play along. I looked at the tute, walked away from the computer, then went and created my own. After finishing mine, I went back and looked at hers again and I see that she had much more intense color -- something for me to work on.
I didn't have Jane's plate to inspire me, so I went to my little lime tree and used a photo of it to fill in some of the background.
My DD gave me this plant for Mother's day and was mightily disappointed that it didn't grow fruit right away (it was only 11 inches tall) -- but as soon as I brought it in for the winter, it bloomed and now it has these little tiny limes!
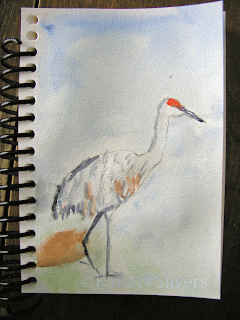
And I've been playing around with my photos of the sandhill cranes that hung around our little park this fall. I drew it in the sketchbook with pencil and had fun painting it with watercolors.
Labels:
journal page,
lemons,
limes,
sandhill cranes,
sketchbook,
watercolor paints
Wednesday, December 5, 2012
Mul-tex Part 3: the Art Quilt
So for the art quilt I started by stenciling dots on the mulberry side. The promotional material that came with this notes that "color applied on the mulberry fiber side glows through when viewed from the shiny, laminate side." Well, I'm all about glow...
After the dots dried, I flipped the mul-tex over and taped it down again. I thinned some turquoise paint with gold mica flake and a little glass bead gel. I painted this on the shiny side (while the dots on the mulberry side glowed through).
I was looking for more texture here, so I mixed the gold with a healthy amount of the glass bead gel -- yep, I was having fun here...
Stenciled butterflies all over the shiny, laminate side. See where it's curling up in the corner? More about that later...
I pinned it to a thin white cotton batt and let it sit for a couple of days while I decided what to do next.
I have two kinds of Mul-tex -- actually they're the same -- the difference is that one is a small roll and the other is on a bolt. I initially took a piece off the roll and drew this tree on the shiny side. But it wouldn't stop curling. I taped and weighted it onto my cutting mat, then left it for over a week. I tried ironing it (between two sheets of parchment), and rolling it back the other way. Still curled.

So then I got the bright idea of paint. Maybe that would make it lie flat. Or at least stiffen it somewhat.
This is the shiny side painted. I laid it on pretty thick. I used a couple of different brands of acrylic paints.
And here it is flipped over. Note: still taped. I like the way the tree glows through. I was thinking that if I had used another color, say, maybe blue, or black, It would have made a really nice effect. But it still curls. To the point where I'm getting really annoyed.
So I cut it into narrow strips and pinned, then sewed it down. You can see where the tree trunk shadows through the green. I like the effect.
I didn't want to do anymore quilting on the shiny background, so I left it here. But I thought it needed something.
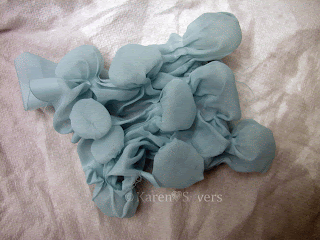
Enter the November technique from the ...Fire blog: extreme texture! I have a bunch of cheesecloth that I've dyed over the years and I picked through it to find this lovely turquoise piece.
 I love the way that cheese cloth takes dye. I scrunched it up and stitched it on using a zigzag stitch. I left a bit hanging over the edge of the binding.
So do I love Mul-tex? No. But it has possibilities. I'm thinking that it might be fun to burn it and maybe play around with heating it with various implements of destruction. But that will have to wait for warmer weather so I can do it outside.
Labels:
acrylic gels,
acrylic paints,
art quilt,
extreme texture,
Fire blog,
Mul-tex
Saturday, December 1, 2012
A Journal Cover to Give Away
But not here...
Then I wet the fabric, scrunched it up, poured diluted copper fabric paint over it and let it dry for a couple of days.
I love the texture -- the little circles looked like moons over mountains to me, so I went with that.
I layered it with a piece of cotton batting and quilted it using cotton threads in several colors. Then I traced around the journal and cut out the part I wanted.
Because old books often had marbling on the inside covers, I dug through my stash of hand-marbled fabrics and chose this one.
Here is the inside of the cover -- I used a plain piece of Kona black to line the inside of the journal cover.
This is a shot of the backside of the covered journal.
There are detailed instructions for making a journal cover here.
I'm linking up with Nina-Marie's Off the Wall Fridays -- even though it's really Saturday.
I was inspired by one of the prompts in the books I'm reviewing tomorrow on the "...Fire" blog. I made a little circle template by tracing around the bottom of the bottle and getting out the deColourant spray that I haven't had a chance to play with. I sprayed a half dozen circles down the length of a half yard of Kona black.
Then I wet the fabric, scrunched it up, poured diluted copper fabric paint over it and let it dry for a couple of days.
I love the texture -- the little circles looked like moons over mountains to me, so I went with that.
I layered it with a piece of cotton batting and quilted it using cotton threads in several colors. Then I traced around the journal and cut out the part I wanted.
Because old books often had marbling on the inside covers, I dug through my stash of hand-marbled fabrics and chose this one.
Here is the inside of the cover -- I used a plain piece of Kona black to line the inside of the journal cover.
This is a shot of the backside of the covered journal.
There are detailed instructions for making a journal cover here.
I'm linking up with Nina-Marie's Off the Wall Fridays -- even though it's really Saturday.
And here is a shot of the front. I will be giving this away in our December giveaway and book review on ...And Then We Set It on Fire. Check out tomorrow's post.
Sunday Update: click here to go to the ...Fire blog and leave a comment to win this book!
Friday, November 23, 2012
Mul-tex Part 2: the Bag
I started with some acrylic paint and this nifty stencil Prochem sent me with my last order. The Mul-tex is taped down because it has a nasty habit of curling on itself.
Here is the finished part of the black paint. I used some extender medium to thin the paint and make it a little less opaque. I'm painting on the shiny or laminate side of the mul-tex.
I let the black paint dry and then sponged red over it. I used a primary magenta and quinacridone burnt orange paints thinned with fluid matte medium. I wanted it to be kind of a wash over the black stencil, so I mixed it pretty thin.
After it dried (this is my kitchen table and DH didn't want any paint on it), I flipped it over and taped it down again -- it's still trying to curl. I got out the gold and stenciled some cranes on the mulberry fiber side.
After it dried, I cut the mul-tex in half and layered each side with black batting and stitched all over. I used red thread on one piece and black on the other.

I made it an odd shape because I thought it would look better that way. I prefer the side that was stitched with the black thread.
And I lined it with a piece of red hand-dye. I know the zipper is a little strange, but I didn't have a red one handy.
Labels:
acrylic paints,
bags,
hand-dyes,
Mul-tex,
stenciling
Monday, November 19, 2012
Messing Around with Mul-tex
I was given some Mul-tex in exchange for the creation of samples of things that could be done with this stuff. Mul-tex is mulberry paper on one side and a shiny laminate on the other. I made this art quilt and the little bag. In the next two posts, I will outline the techniques I used to create each of these.
---Stay tuned...
Friday, November 16, 2012
Special Dye for Jack-in-the-Pulpit
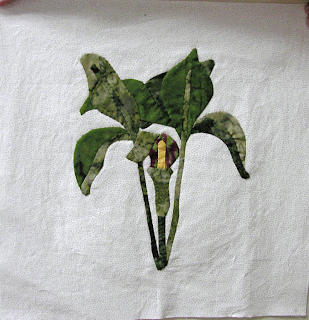
So my friend Alice was making a special hand-appliqué quilt featuring Wisconsin wildflowers and she needed some "purple and green striped fabric" for her jack-in-the-pulpit block.
"Anything you do will be just fine," she assured me as I went into extreme-dyer's mode and wanted to know how large to make the stripes, what shades of green and purple --olivey green? limey green? grapey purple? "I'm sure I will love anything you do," she calmly told me as she smiled her pixie smile.
I really like her and her work (she has been a most prolific quilter, only recently venturing into the art quilt realm -- about which I am extremely excited!) and I wanted this fabric to be special. "I just need a little bit -- it's for a tiny part of the flower," she said. Well, I can do that. So I got out my stuff and decided that thickened dyes would be just the thing. I had great fun painting them on the fabric using the little squirty thingies (pipettes) that I find so useful for all kinds of art projects. I could hardly wait until the next class to see her and give her the fabric.
And it took a while, but she came to the last class with this. She said she started with a book, but some of the flowers were "incorrect." So she had to change them.
And here is a closeup showing the fabric I created in the center of the flower.
I am linking up with Nina Marie at Off the Wall Friday.
Labels:
appliqué,
hand-dyes,
Off the Wall Fridays,
thickened dyes
Tuesday, October 30, 2012
Stones and 3D Shibori
Over at the "...Fire" blog this month's technique is 3D Shibori. Here is a link to Nienke's wonderful post on this fun technique. Apparently if you tie up "stuff" in polyester and boil it, it will change the shape of the fabric.
I was all excited about this and eagerly scouted my local thrift store for polyester scarves. No, I didn't seem to have any of my own and because it's October in Wisconsin, the only scarves I found were the knitted variety that are supposed to be worn for warmth rather than style.
I did score a beautiful navy blue silk scarf that I'll be using in a future discharge experiment, but I found only one possibly polyester one. So I got some sheer curtains that appeared to be polyester and gathered up some river stones. I tied them up and threw them in a pot of boiling water. I did the same with a scarf that I suspected of being polyester.

I let them boil together for 20 minutes, then plunged them in a bowl of ice water. When they were cool, I unwound the string and removed the stones. And it worked!
I did just a corner of the scarf because of its dubious origin. I'll probably try a different tying technique on the rest of the scarf.
Here is a closeup of the scarf. It's still wet in this photo.
And here is the chunk cut from the sheer curtain. The scarf dyed it blue! I was thinking that I wanted something like mushrooms on a piece I'm working on, so I plan to try it again with only white fabric in the pot.
I'm linking up with Nina Marie at "Off the Wall Friday."
I was all excited about this and eagerly scouted my local thrift store for polyester scarves. No, I didn't seem to have any of my own and because it's October in Wisconsin, the only scarves I found were the knitted variety that are supposed to be worn for warmth rather than style.
I did score a beautiful navy blue silk scarf that I'll be using in a future discharge experiment, but I found only one possibly polyester one. So I got some sheer curtains that appeared to be polyester and gathered up some river stones. I tied them up and threw them in a pot of boiling water. I did the same with a scarf that I suspected of being polyester.

I let them boil together for 20 minutes, then plunged them in a bowl of ice water. When they were cool, I unwound the string and removed the stones. And it worked!
I did just a corner of the scarf because of its dubious origin. I'll probably try a different tying technique on the rest of the scarf.
Here is a closeup of the scarf. It's still wet in this photo.
And here is the chunk cut from the sheer curtain. The scarf dyed it blue! I was thinking that I wanted something like mushrooms on a piece I'm working on, so I plan to try it again with only white fabric in the pot.
I'm linking up with Nina Marie at "Off the Wall Friday."
Sunday, October 28, 2012
Blogger's Quilt Festival -- Statia's Hummingbird
"Black Chinned Hummingbird on Oleander"
From a photo © Statia Dougherty - used with permission
Blogger’s Quilt Festival Stats
Finished quilt measures : 20" by 25"
Special techniques used : painted on wholecloth cotton with fabric paints, trapunto, thread painted and quilted with cotton thread
Quilted by : Karen Silvers
Best Category : Art Quilt, Home Machine Quilted, Wall Hanging
I created this quilt after being inspired by my friend Statia Dougherty's wonderful hummingbird photos.
I had some new fabric paints from Prochemical and, after securing permission from Statia, I tried them out with her photo as my guide.
The little bird was layered and quilted first before I layered and quilted the background so that he would stand out from the background. I used Aurifil 50 weight cotton threads.
I chose to finish it so that it would resemble a matted photograph with a frame.

I'm linking up with Amy's Creative Side Blogger's Quilt Festival, Fall 2012 edition.
Subscribe to:
Posts (Atom)


