Monday, May 30, 2011

Holiday Design Potpourri

 Today my design wall has the beginning of my Color Palette Challenge for May.  I took a break from my journal quilts because I was busy finishing the faerie project.


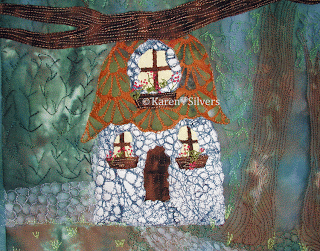
This is the little faerie cottage with its embroidered stuff in the flower boxes.
And the back side showing the machine quilting. I'm finishing up the hand work on this -- it's almost ready.

To see other design walls this holiday Monday, click here to visit Judy's blog

Saturday, May 28, 2011

Fauna for the Faerie Forest

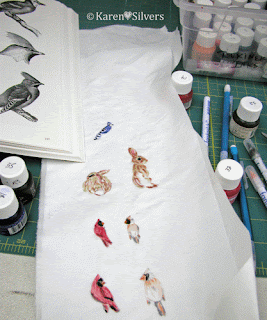
 I needed some birds and bunnies to keep the faerie company.  So I got out my trusty Tsukineko inks and used them to color in some pencil sketches of birds and bunnies.  I had ironed the fabric to some freezer paper to stabilize it while I used the pencil.

With the colors inked in, if I missed a stitch, I didn't have to worry about white fabric showing through.


The first set of cardinals that I drew were too large for this project.


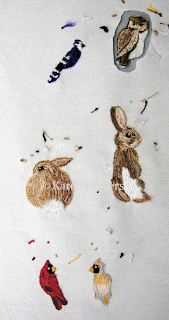
Using a small needle, I covered the little drawings with thread.   Hand embroidery seemed like the best way to go with these.  They're quite tiny.


I cut them out, leaving a small seam allowance -- somewhere between 1/8 and 1/4 inch.
 I used appliqué glue to make the seam allowance stick to the back.

Then I stitched them onto my quilt.  I'll have some more photos next time.

Wednesday, May 25, 2011

Mini Margo Finished

 I used those cool pieced bits from my design wall and made this mini-Margo bag.

This is the back side posed in front of the full sized Margo bag for comparison.


This is the front side with the piped pockets.  The green is a bit more limey in color -- I couldn't get the colors right in the photos.  At least -- that's what my monitor looks like.  That light blue is really a great shade of turquoise.

Except for the stripes, these are all my own hand-dyes.


This is a shot of the inside.  I changed the pocket configuration a bit.  The orange-lined side has a sectioned pocket all the way across.  The blue-lined side has a single pocket with a Velcro closure.


I made the straps a little less wide and used rings to connect them to the rest of the bag.  I think if I made this size again, I would make the straps the same width as the original.  I did keep the length because it's perfect.

Check out that lime green zipper!
 This pattern is so well-written.  Making a smaller version was a snap!

This is probably the last bag I'm going to make for a while -- I hear other projects calling me...

Tuesday, May 24, 2011

Piping Tutorial


I had an email request for a tutorial on piping.  I love the way piping can really set things off.  I made lots of it when I was still making smocked dresses and it's easy-peasy.  So here is my method and I'll end with some instructions for inserting it into the Margo bag by Lazy Girl Designs.

 I often used different fabrics for piping on the same garment to set off necklines and faced armholes.

In smocking, piping is traditionally used to strengthen and set off the yoke from the smocked portion of the garment.  I also used it around the edge of the collar and arm bands.


First cut a square of the fabric.  I cut only a small square here because I wasn't making a lot.  Using the lines on the cutting mat, align it and cut 1 inch bias strips on the 45º diagonal.  Quilting rulers make this really easy.  I bought my first cutting mat and ruler long before I started quilting just for making piping.


Pin the bias strips -- if using stripes, it looks really good to match them here.  Stitch, then trim and press the seams open.


I use relatively thin cotton yarn for the cording.  It washes well and doesn't get stiff like some of the synthetics.  For really thin piping, like on the blue dress above, I used perle cotton thread for my cording.


Cut a length of the yarn that is a bit longer than the length of your sewn bias strips.  Lay it in the center of the strip and finger press the strip over it, pin, matching the raw edges.  Gently push the cord toward the center of the strip.  Don't iron a crease in your strip!  You want the fabric to surround the yarn, not a harsh edge that would be created by using the iron.  

I use a piping foot (pictured above) to stitch.  It has a groove on the underside that the cord travels through.  It's not necessary -- a zipper foot works just fine.  The idea is to stitch next to, but not on, the cord.   I try to remember to use a little longer stitch length when I make the piping -- I think it makes the piping a little less stiff so it will go around curves a little easier.  
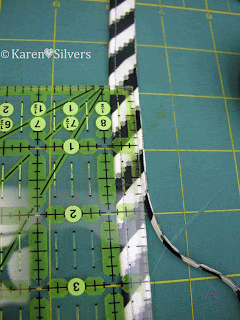
After stitching, lay the piping along a line on the cutting mat, place a ruler with the quarter inch mark over the stitching and trim off the excess.
This is your finished piping, ready to insert into your project.

For the Margo bag, mark the lines using your template.  This is a stitching line, so pin the piping through the stitching to the drawn line on the right side of the fabric.  I do my marking on the pocket lining, so if I make a mistake, it will not show on the front of my bag.  Be sure to place the piping so that the cord is facing the inside of the piece.  The cutout for the pocket will be trimmed after the piping is placed and the lining is sewn to the front of the pocket.


Clip the piping up to, but not through, the stitching to go around the corner.

Then stitch right on top of the stitching on the piping, pivoting at the corner.

After stitching the piping to the lining, pull out a little bit of the cord and trim off about an inch or so at each of the the edges.  This reduces bulk in the seam lines and, for things that will be washed, releases the cord from the seam so that if the cord shrinks, it will not make the garment or bag draw up.

Pin the front to the lining, right sides together, with the piping inside.  Carefully stitch on the line of stitching that holds the piping to the lining.

Press, trim, and turn.  Press again, gently pulling on the piping to make a smooth edge.  Topstitch next to the ditch on the front of the bag pocket.
I particularly like using stripes for piping because when cut on the bias, they look really cool.

When you feel brave, cut the bias strips at 3/4 of an inch and skip the trimming.  Also, after you get brave, you can skip the pinning and just push the cord against the center of the fabric when you sew.

I have left all the photos fairly large, so be sure to click on them for a closer look.

Monday, May 23, 2011

Monday Design Progress

 It may not look like much, but there is progress.


To see other design walls today, click here to go to Judy's blog.

This is the front of my new bag.  I finished the piping and sketched some lines for decorative stitching across the front.

Next post:  piping tutorial.  Stay tuned...

Friday, May 20, 2011

Pretty in Pink

I started this dress a couple of years ago -- back when my daughter was still enamored with pink and purple and princesses.  Before she entered into the evil clutches of Hannah Montana and all those ridiculous Disney shows.  But it was just so pink -- I just had to take a break from it.   Well, the break turned into a couple of years and the next thing I knew, she wasn't interested in a homemade dress in (gag) pink and purple.  So I put it away and forgot about it.  

Then my SIL mentioned that her granddaughter loves all things pink.  And they were coming here for a visit.  Hmmm...so I remembered this project and unearthed it from the towering pile of things to do.  It only took one night in front of the TV to finish the smocking.  Had I known that it was only an episode or two of Triple D away from completion, my DD might have worn it.   But that's how things go -- and I know it will be appreciated by its new wearer.

I used this smocking plate -- the hearts are stacked cables, or picture smocking.  After a couple of years' break, I had to remember how to do them.  But it turned out well -- I can't tell the new hearts from the before ones.

The pattern is my own configuration -- I can't remember what I was going to use for it and it wouldn't have fit a three year old anyway.

 And just for fun, I made her a little bag to go with from the scraps.

Long time readers may notice a new copyright logo on these photos.  That's because my friend Beth, who blogs here, sent this to me for my birthday.  I'm still working out how to use it -- but suffice it to say, I'm thrilled with it.  Thanks, Beth!

Monday, May 16, 2011

Design Wall Monday

Today my design wall has another free-form piece -- along with some other stuff that I'm still playing with.

I want to make a bag for myself this time.  I've had so much fun with the bags in last week's posts, I'm going to make one in a slightly smaller size.  I plan to use this bit on the lower right side of my wall.

But first, this week I'm going to try to finish a smocked dress that I've been working on for, um, more years than I want to think about.

Stay tuned...


To see what other design walls look like this week, click here for Judy's blog.


Sunday, May 15, 2011

Tassel Tutorial


I decided the Purple Passion Margo bag in the previous post needed a tassel pull on the zipper to complete the look.


I gathered up the Color Catchers I use in the washer when I wash hand-dyed fabrics.  I used these because they're some kind of synthetic fabric and they have this marvelous color but don't ravel or fray.  I also got out some largish beads, and embroidery thread.


I stacked the pressed Color Catchers and cut them into 1/8 inch strips.


I cut a 20 inch length of embroidery thread.  I folded the strips in half to mark the middle, then tied the thread around the center of the strips, leaving one side of the thread about 4 inches, and the other around 16 inches.  I didn't measure the thread ends, just eyeballed them.  Also, I used all six strands of the thread -- I did not separate them.

When I was happy that the thread was tied in the center of the strips, I tied a tight square knot.
Then I formed a loop with the shorter end of the thread.

I tightly wrapped the longer end of the thread around the strips and the shorter end of the thread.  When I got to the end, I tied a square knot with the two ends of the thread.  I had to be careful here because it's easy to  pull too tight and lose the loop.  I trimmed the ends of the embroidery thread.

Then I made a knot in the loop so it wouldn't go anywhere.  I probably should have done the knot in the loop before winding the thread, but I wanted the thread to lay flat against the top of tied strips.

I snipped the ends of the strips so they would have little points.  Using a folded wire, I added beads to some of the strips and tied a small knot at the end of each of the beaded strips.  I added a small clip through the loop at the top and attached it to the zipper pull.

I have left all of these photos large, so be sure to click on them for a closer look at any of the steps.

Purple Passion Margo Bag


I needed to make something for a valued client of my husband's and the only thing I really know about her is that she likes purple.

So I dug through my stash and found this strip set of purple fabrics that I made for a bag I made for myself.

I remember at the time I was slightly appalled at the vast quantity of purple in my stash -- that's a lot of purple.

But I really like the way that all these purples work together so I made this bag with my trusty Margo pattern from Lazy Girl Designs.


Here is the front -- that strip in the center is from some of my own shibori-dyed fabric.  There are a number of my own hand-dyes in this.


I decided that the strips looked best going sideways on the back.
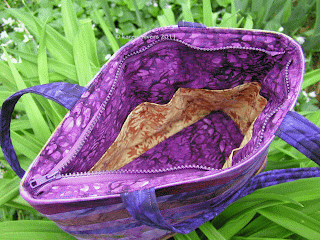
 And inside are some batiks.  I LOVE this bag -- it is my favorite of all the ones I've made so far.  It's very difficult to give it up.  And I'm not really even a "purple person."


A better shot of my irises -- I noticed them blooming yesterday.  It's so cold out this weekend.  I think maybe they look a little bluer than usual...