

I had an email request for a tutorial on piping. I love the way piping can really set things off. I made lots of it when I was still making smocked dresses and it's easy-peasy. So here is my method and I'll end with some instructions for inserting it into the Margo bag by Lazy Girl Designs.


I often used different fabrics for piping on the same garment to set off necklines and faced armholes.

In smocking, piping is traditionally used to strengthen and set off the yoke from the smocked portion of the garment. I also used it around the edge of the collar and arm bands.

First cut a square of the fabric. I cut only a small square here because I wasn't making a lot. Using the lines on the cutting mat, align it and cut 1 inch bias strips on the 45º diagonal. Quilting rulers make this really easy. I bought my first cutting mat and ruler long before I started quilting just for making piping.


 Pin the bias strips -- if using stripes, it looks really good to match them here. Stitch, then trim and press the seams open.
I use relatively thin cotton yarn for the cording. It washes well and doesn't get stiff like some of the synthetics. For really thin piping, like on the blue dress above, I used perle cotton thread for my cording.

Cut a length of the yarn that is a bit longer than the length of your sewn bias strips. Lay it in the center of the strip and finger press the strip over it, pin, matching the raw edges. Gently push the cord toward the center of the strip. Don't iron a crease in your strip! You want the fabric to surround the yarn, not a harsh edge that would be created by using the iron.
I use a piping foot (pictured above) to stitch. It has a groove on the underside that the cord travels through. It's not necessary -- a zipper foot works just fine. The idea is to stitch next to, but not on, the cord. I try to remember to use a little longer stitch length when I make the piping -- I think it makes the piping a little less stiff so it will go around curves a little easier.
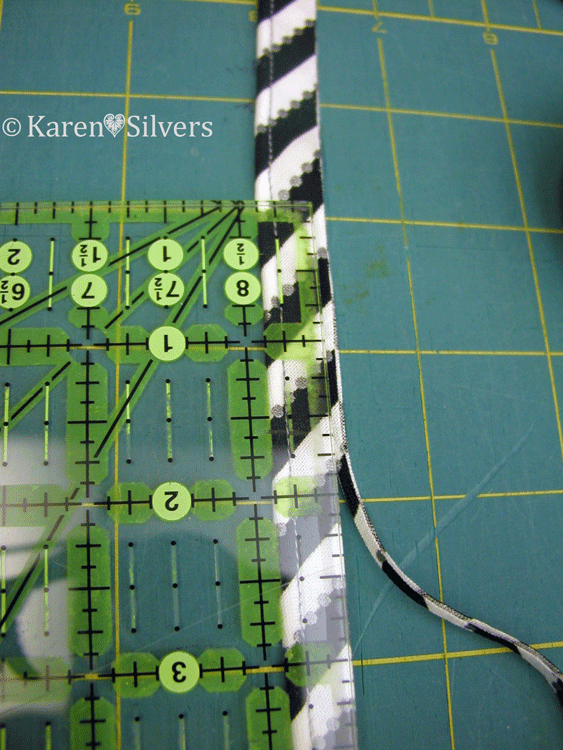 After stitching, lay the piping along a line on the cutting mat, place a ruler with the quarter inch mark over the stitching and trim off the excess.
This is your finished piping, ready to insert into your project.
 For the Margo bag, mark the lines using your template. This is a stitching line, so pin the piping through the stitching to the drawn line on the right side of the fabric. I do my marking on the pocket lining, so if I make a mistake, it will not show on the front of my bag. Be sure to place the piping so that the cord is facing the inside of the piece. The cutout for the pocket will be trimmed after the piping is placed and the lining is sewn to the front of the pocket.
Then stitch right on top of the stitching on the piping, pivoting at the corner.


Press, trim, and turn. Press again, gently pulling on the piping to make a smooth edge. Topstitch next to the ditch on the front of the bag pocket.

When you feel brave, cut the bias strips at 3/4 of an inch and skip the trimming. Also, after you get brave, you can skip the pinning and just push the cord against the center of the fabric when you sew.
I have left all the photos fairly large, so be sure to click on them for a closer look.


2 comments:
Good tutorial, Karen! Just the other day a friend was asking me about piping so I just sent her a link to your post. You really covered it well. Those little clothes in the photos are so darling! You really do a good job. Thanks for your generous sharing.
Thank you so much for sharing your expertise! I have two new granddaughters and will love to use this narrow piping in their little dresses (yours are darling, BTW). I didn't know you could use cotton yarn and perle cotton as filler--what a perfect size for little girl clothes and purses, too. Love, love the piping along the Margo pocket. Definitely want to give that a try!
Post a Comment