Wednesday, April 28, 2010

Quilts Come Home


From time to time, I make samples for my LQS, Stitcher's Crossing.  It's a win win situation -- they get a sample to help sell their quilts and I get a free project.  Because I never buy kits, it's a fun exercise for me to follow directions.  They keep the quilts until all the kits and/or patterns are sold, then I get the quilt back.


These have been hanging at Stitcher's Crossing for quite a while.  They finally sold all the patterns and kits, so I got them back.  They're a nice size -- just right for a crib or the couch at the office.


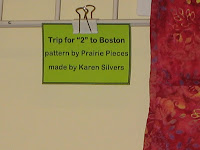
I really couldn't decide which I liked better.  Monday I liked the red one better, Tuesday, the blue one.  The pattern has instructions for two people to make them, but I needed to get them done and no one was available that weekend, so I made them both myself.  Now I get to keep them both.  
The really nice thing is that, while I have to follow the directions to make the quilt tops, I get to quilt them any way I like.  So I did them very differently.  The red one, I did lots of feathers -- all the way around.

The blue one I did more traditionally -- kind of like sashiko. 

Saturday, April 24, 2010

Warning! Danger! Warning, Will Robinson!

Kids!  Don't try this at home!

WARNING: IF THE INFORMATION IN THESE INSTRUCTIONS IS NOT FOLLOWED EXACTLY, A FIRE OR EXPLOSION MAY RESULT CAUSING PROPERTY DAMAGE, PERSONAL INJURY, OR LOSS OF LIFE.

Warning: Don't drive or operate heavy machinery while using this product.

Warning: Professional driver on a closed track.

WARNING: IMPROPER INSTALLATION, ADJUSTMENT, ALTERATION, SERVICE, OR MAINTENANCE CAN CAUSE INJURY OR PROPERTY DAMAGE. REFER TO THIS MANUAL. FOR ASSISTANCE OR ADDITIONAL INFORMATION CONSULT A QUALIFIED INSTALLER, OR SERVICE AGENCY.


And with the requisite waving of arms and tentacles, I tried it.  I did it at home.  On heavy machinery.  Well, actually, it's not my heaviest machine.  That would be my mom's old Kenmore that needs a visit to the repair shop and some new parts and which lives under the table.  I used my Viking Husquvarna.  And I survived.


I did a thread sketch á la Karen M over at RabbitsEatQuilts.  Karen has consistently done amazing work with her machine illustrating each week's Creative Cue.  So I decided to try it.  I am a pretty good free motion quilter, so how hard could it be?  Ha!  Deceptively difficult.  I have appreciated each and every one of Karen's sketches, but now I have an appreciation so deep as to defy description.  These are hard.

Last week's Creative Cue was "side"  -- as in: side of beef.  At least that's what I thought.  And this week was "full"  -- as in: full of steaks.  So, because I am a couple of weeks behind, I am killing two birds with one stone (I really like birds and wouldn't kill them with stones or anything else so don't send me an email about this).  I do like steak and occasionally grill one out back, but they come wrapped in see-through plastic and in no way resemble these critters  (it's just easier that way).  I drive past a field where sometimes these lovely long-horned creatures hang out and I love to stop and snap their pictures.  Unfortunately, they all get up and leave when I approach.  So I have to shoot fast.  I want to make a quilt featuring their wonderful bovine faces.  This was the first step.

Friday, April 23, 2010

100th Post Extravaganza!!!!!! WoooHoooo!!!!!!

Or not.   I wouldn't have known about it -- but Blogger helpfully keeps track for me and I happened to be in my dashboard and noticed.

I suppose that I should do something special like, um, host a giveaway, or maybe a show...hmmm -- I'll have to think about that.  Oh wait -- then it wouldn't be the 100th post anymore.  Oh well.  I guess this is indicative of  more sloppy record-keeping that I didn't think of this earlier and have something planned.

Fortunately!  I was reading Robin Atkin's recent Beadlust (ooh baby, I love that title -- maybe I could be fibrelust next...) post and she issued a challenge to revisit your 6th posted photo from when your blog was new and critique it.  Hmmmm...

Fortunately (again), I am a fairly new blogger, so I had to go back only a few months to pick that photo and it was this one:

It's funny that it was this one (okay, maybe not loud guffaw funny, but certainly worth a chuckle or two), because I sent a friend a link to this very photo and she mentioned that it would not enlarge when she clicked on it.  And when I checked the post (here), none of them would.

That's because I didn't know that if you cut and pasted in Blogger, your pictures wouldn't enlarge.  I've learned a lot since; but I have also learned that as soon as I know something, they change it.  It's enough to make a person become a Luddite.  As long as I can keep my sewing machine.  We have a relationship, you know...  I used to tell my DH that if he were a sewing machine, he would be this one.  Or maybe if a sewing machine were him, it would be this one... or something like that...  But I digress.

As for the critique:  I would have brightened it up (the photo) before I published it. And cropped it better.  Maybe like this:


 I might have posed it differently. I would have used a different background.  Maybe like this:


Still not crazy about it -- it's so hard to take an action shot of a purse.  And the color is close, but not quite perfect.  I think I like it better with the handle smooshed down -- like in the original shot.  So many choices.

But I definitely would have made it so that you could click on it to enlarge it.  Thanks, Robin.

Thursday, April 22, 2010

Chicago Festival 2010 - the Quilts

I was rather disappointed in the class offerings this year -- there were a couple that I would have liked to have taken, but none that I really needed.  I took a class with Judy Coates Perez last year and, while I love Judy and would take another class with her in a heartbeat, the rooms where the classes were held were less than stellar.  And the ladies room was too far away.

Festival is moving from Chicago next year (as is the friend with whom I stay), so I probably won't be attending. In no particular order, these are some of my favorite quilts from Festival.


Hoffman Challenge  "Tembo" by Colleen Harvey

This quilt was just wonderful.  The elephant was completely threadpainted and the ears hung loose.  I loved the fabrics she used -- the stuff in the border looked like tapestry and the little swirling paisleys in the background and the corners were just cool.


"Here Kitty Kitty" by Georgianne Kandler

Another from the Hoffman challenge.  I had to look twice to see the lion.  The eye was really well done and I loved the curving inner border.


"Early Spring in Banff" by Judy Leslie

I'm pretty sure this was one of the Canadian group.  There was beautiful thread work and felting on this piece.  From the painted (?) trees at the top to the beautiful texture of the foreground -- a wonderful work.  I soooo wanted to touch it.


"Crazy About Ballet" by Linda Steele

This was an amazing piece -- a restrained crazy quilt with beautiful embroidery.  The details and the quilting were gorgeous.


Detail from "Crazy About Ballet"

This dancer and her beau were my favorite part of this quilt.  The entire skirt was thread painted and looked like she used trapunto to give it dimension.  Notice all that embroidery -- the whole quilt was like this.


My Stash at 50 (aka Log Cabin with an Attitude) by Karen Eckmeier

This quilt had it all -- color, whimsy, and great execution from the colorful wonky blocks to the multicolored binding.  Just fun fun fun to look at.

Wednesday, April 21, 2010

ATCs and Some Fishy Stuff


"Fish Tales"

While at Festival in Chicago last week, I coerced talked Beth into taking one of the little mini-workshops that Quilting Arts offers at their "Make It University" extravaganza in the middle of the vendor area.  It was an ATC-making workshop with Jane Davila (who blogs here).  We were each issued a little (3 1/2" x 2 1/2") piece of fabric-covered heavy stabilizer, a square of PFD fabric, a small plastic plate, a tiny foam roller, a piece of freezer paper, and a small rubber fish.

We went to the front of the roped-off area with tables in it class and poured a bit of blue or green Lumiere paint onto our plate (Beth and I just had to pick more than one -- she had two colors and I, three).  Then we rolled the paint onto the rubber fish, wiped the eye (Jane said that it's a custom to ink in the eye later so it doesn't lose its soul, or something like that) and carefully printed the fish on the fabric.  Sorry I don't have any pictures of the process, but I was caught up in the moment.  We colored the fabric that was stuck to the stabilizer with diluted acrylic ink, stamped it with Jane's hand-carved stamps, then fused the cut-out fish on top of a small bit of paper that looked like a net.  I added the stitching around the edge after I got home using some of my fancy new WonderFil metallic thread that I bought at the show.


I had a bunch of stamped fish left over on the fabric she gave us -- she wouldn't let us keep the rubber fish, but I guess I can live without it.  So using some colored silk that we stole, um, bought (it was really cheap), some painted Peltex, some dyed cheesecloth, and a few beads, I made a half dozen more ATCs.


While I was there, I also traded a couple of ATCs that I had made previously for these ones.  The artists who made them are: Lisa Cousineau (who blogs here), Sally Ann Licocci, and I couldn't read the name on the back of the snowman ATC -- it starts with a W and she's from Blue (something that starts with an M), Il.

Next: more Festival quilts (and more of my humble opinions).

Tuesday, April 20, 2010

Chicago Festival 2010


"Schizo Rose" by Judy Robinson Ehrnst

So while I was driving down to Chicago last week, I was struck by the verdant green of the countryside.  Every past year, it's been brown and ugly -- not quite winter anymore, but decidedly not spring yet.  All the way down there (2 1/2 hours by car), I composed in my head this wonderfully poetic blogpost, waxing rhapsodic about all the spring colors, the birds, and the lovely look to the trees veiled in their new spring finery.

And then I got there and I got so excited, I completely forgot everything I was going to say.  Bummer.

Since I have been a rather neglectful blogger this past week, I will parcel out the stuff I did during my whirlwind tour of Festival over a couple of shorter posts, rather than one long, potentially boring, blogpost.  That way, if I'm at all boring, readers can skip to the next bit.

I took pictures of some of the quilts -- much of the exhibit had stern "No Photography" signs (which I obeyed to the letter) -- so I missed a wonderful shot of an elderly man sitting under one of those signs with his camera out and ready to go.  But mostly, I had fun walking around with my friend and looking at all the stuff.  It was amazing how many people whom I knew that I ran into.

For a look at some of my favorite quilts (and my pictures, too -- thanks, Beth) click here.

And I just had to post this one -- it was my favorite one of all:  front, back and a detail shot:
"In Hiding"  by Barbara Shapel

Tomorrow:  all about ATCs and some fishy tales...

Saturday, April 10, 2010

Ta Da! Jasmine!


"Jasmine" -- WIP fused hand-dyes

After all the big pieces are in place, it's time to do the little pieces.  After tacking most of it together with the edge of a hot iron, the large pieces of freezer paper can be carefully removed using the tweezers.  Then the tiny pieces can be placed using the tracing paper as a guide.  I laid the tracing paper over  as a guide and carefully set them on the appliqué.  It's best to remove the freezer paper before placing them -- I left it on for the pictures, but it's really hard to remove it without pulling up the lightly fused bits.  Also, tracing paper doesn't work as well as parchment under the iron -- I think it has a lower "smoke point"  (don't ask me how I know...).  I may try using a piece of parchment for tracing next time.

Next is the hard part -- choosing the background.

Friday, April 9, 2010

More About Jasmine the Pit Bull

In my research, I discovered that, unlike the Bernese Mountain dog's basic black,  Pit Bull noses come in lots of colors -- pink, red, brown, black, and (!) blue.  Who knew?

Also, as a breed they are not recognized by the AKC unless they are Staffordshire Bull Terriers.  American Pit Bull Terriers, like Jasmine, are recognized by the United Kennel Club and are described as "excellent family companions" and characterized by a love of children.  They are further described as "eager to please and brimming over with enthusiasm," but not a good choice for guarding because they are "extremely friendly, even toward strangers."


There is a rather large caveat, however: "Because most APBTs exhibit some level of dog aggression and because of its powerful physique, the APBT requires an owner who will carefully socialize and obedience train the dog."  I suppose this is why I don't see a lot of them at the dog park.  But according to Pit Bull Rescue Central: "While pit bulls do carry the potential for dog aggression, the vast majority of pit bulls are very far from 'fighting lines,' and many are not dog aggressive at all."


It seems to me that this would be a really good dog for a woman who lives alone.  I know there are stupid criminals out there, but not many would be foolish enough to mess around with a large dog -- however "friendly" it appears.  Thus, anybody with one of these dogs would be safer with than without.  I always feel safe walking around with big Rosie -- even though anyone who knows anything about her would agree that she is the Gandhi of our neighborhood.  


Also, if lots of young women have these dogs, they might become known as "chick-dogs" (like "chick-flicks," "chick-cars," and "chick-tunes") and lose their cachet for dog fighters.  With this new tag, pits would then receive a certain amount of derision by the same reprehensible element that is likely to try to train these dogs to kill each other for "sport."  Therefore, that element would be forced to pick a more "manly" breed, such as the dachshund or Bichon Frise, to train for this disgusting endeavor and then might be frustrated with the results and desist altogether.  


As my kids say, "just sayin'."

Wednesday, April 7, 2010

Jasmine Part 3

I started ironing the pieces of freezer paper to the fabric.  I cut them out and fit them together as I go so I don't forget which piece goes where -- they look a lot alike when they're cut apart.  I guess I could have numbered them to make them unique (but that smacks of record-keeping -- ha!).

It's important to use really sharp scissors to cut the fabric so that there aren't any little threads hanging off (unless, of course, you like that look.)

As the pieces are cut out, it's helpful to look at the intact picture and figure out which pieces would logically be on top.  The pieces that will be underneath need a little "seam allowance" so that there will be some overlap of the pieces.  This is for two reasons.  First, I don't know what background I'm going to use and I don't want any of it showing through between the pieces.  Second, I think it makes the work physically stronger  -- as in: not as likely to fall apart.  Although with all the thread that I'm going to put on this, it will be plenty sturdy.   Of course, it would not be good to have really dark fabric shadowing through the light, so that's something else to consider.

I use a pair of tweezers and my precious porcupine quill (thanks, Beth) to move the pieces into place.  Then I tack them together with the point of a hot iron so they don't slide around.

Tuesday, April 6, 2010

Jasmine Part 2

In the first post (here), I had turned the line-drawing tracing of Jasmine upside down so that the picture was reversed.  This was because I was going to piece it.  After looking at all the tiny pieces, I rethought my strategy and decided that fusing was the way to go.


So I flipped my tracing back over and used a different color of Sharpy (so I wouldn't get confused as to which was which) and traced the whole thing on freezer paper twice.  I made sure that I had the little parts of her face traced a third time because I'm going to layer the eyes and parts of the snout on top so I don't have to cut out all those tiny pieces.

I marked the pieces with the color ( I used a secret code: L1 for lightest, L2 for next darker, M1, M2, D1 in order, then D2 for darkest.)  I decided to use a beautiful dark brown  for her eyes that I found in my stash because Jasmine has beautiful brown eyes.  

I had pulled out a nice range of hand-dyes in some pretty bright colors and checked them  on the copier in black and white to make sure that I had the values correct.

As I looked at these fabrics, I decided that the orange and green were too jarring with the other colors, so I replaced them with some pinks and lilacs.
I pulled a couple of Shibori-dyes for the choke chain around her neck (she is not my dog, so please don't send me any emails about it). 
  
Can anybody tell me why, oh why, all the best parts of a shibori or hand dye are always in the middle of the piece?  So I didn't cut it now, I'll figure that out later.  
I ironed fusible (I used Wonder Under because it was there) to the backs of the fabrics and peeled them off the backing.  I set them on baking parchment on my ironing board.

I set up the fabrics in order from dark to light and started setting the cutout freezer paper pieces on top.  I didn't cut out the whole thing at once because I don't want to forget where I am when I come back to it.  So far, I have cut out her back parts and the big pieces of her face.
That's Rosie under the ironing board.  She got to go to the dog park yesterday, so don't feel too sorry for her.

Monday, April 5, 2010

Ink with Glue

So I saw on this blog here an experiment with glue and alcohol inks that looked pretty cool.  I thought it would be fun to try it on fabric.

I used some Aileen's Tacky Glue -- I had to dilute it because it was way too thick.  If you look carefully at the bottle in the photo, you might notice teeth marks -- I suspect that my dog was inspired to use this as a  chew toy briefly and the small holes were letting air in and making the glue thicken on its way to drying.

I spread the glue over plain white PFD cotton set on some baking parchment.  I took it outside because alcohol and heat together didn't seem like a really good combination for inside.

Then I dropped  alcohol ink all over the wet glue surface -- I used mostly Stream and Butterscotch, with a little Slate to fill in the white areas where the color didn't spread.


Then I hit it with a heat gun.  The ink/glue mixture bubbled up and the glue went from white to clear.  I added a little more Slate to fill in where the ink still hadn't spread and heated it again.
The dried piece felt leathery -- not plasticky like I expected.  The colors are really bright and deep.
So next I took a piece of cotton and layered it with batting on stabilizer. I quilted it with cotton thread.
Then I did the whole glue, ink, heat thing again.  It's pretty stiff, but I cut it easily with a rotary cutter and stitched up the edges on my machine.
They looked nice, but needed something, so I got out the foil.  I found that it stuck to the surface nicely when I heated it with my iron -- must be the glue (duh).

I haven't decided if I'm done with them, but I really like these colors and the gold foil really sparkles.  Maybe some beads, or something.  Or not.  I think I like them simple.