Showing posts with label frogs. Show all posts

Monday, September 26, 2011

Just Can't Decide...

 My design wall has a project I can't show right now, so I'm soliciting assistance on this project.  I've been working on it for weeks and I just can't decide.

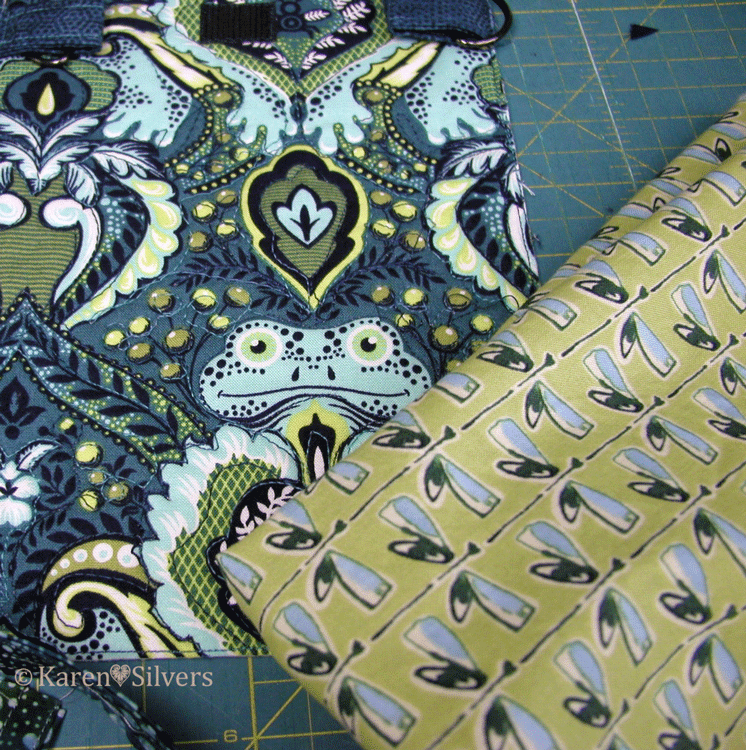
It's not that important, but I love the Tula Pink Prince Charming fabric so much and I want to use this bag for my very own.

Toward the left of the photo are the outside pieces of the bag and on the right are two possibilities for the front pocket.  That's the strap lying across the bottom of the photo.
 This is choice number 1 for the front pocket.  This is from the same line of fabric as the outside of the bag.  But I think it's maybe too bold for the front pocket.
 Choice number two -- it's from a different line of fabric.   I like the buggy look to this.  And frogs and bugs go together so well.
 Choice number three -- this is more of the Prince Charming line.  I'm not crazy about this fabric by itself, but it's a nice backgroundy kind of print.
 And choice number four.  This is from the same line, but a different colorway.  I love the raindrops, but I think the scale is all wrong for a small pocket on the front of the bag.  And the colors are too soft -- I would like to bind it with some dark teal.

For more design walls, click here to go to Judy's blog.

Thursday, March 31, 2011

Finally Finished the Frog Quilt!

And just in the nick of time!  I dropped it off this afternoon for the show.

"Frog Leg Pie"
58" x 58"
Adapted from "Blueberries and Key Lime Pie" by Klaudeen Hansen
Fudge Factor Patterns


For the binding I used a new (to me) technique.  "Faux Piped Binding" -- it was not difficult and it looks fabulous.  And I did the whole thing on the machine.  The tutorial is here and I think it's a really good one.
I used cotton flannel for the back so it would be warm and cuddly.  I think it's going to live in my spot on the couch.


I had a little trouble with the label.  I followed the directions (for the first time) and (for the first time) the ink bled.   I usually heat set it before I rinse it, but the instructions say to rinse after the ink dries.  I let it dry overnight, then I rinsed and hand-washed in a little Synthropol.  And the silly thing bled.  I used it anyway.

Next time I'll be sure to follow directions -- not.

Monday, March 28, 2011

WIP Monday

My design wall hasn't changed much since last week except for the addition of this tiger.  I was going to have a little stone cottage finished, but it didn't happen.  I was going to have a little fairie started, but it didn't happen.


I was going to have this finished also --
but it's not quite ready.  Maybe tomorrow.


For more Monday design walls, click here to go to Judy's blog.

Monday, November 29, 2010

Monday Aftermath


This is my design wall today.  The frog quilt is still up there because I haven't gotten around to sewing together the backing pieces.

I don't know why, but it seems much harder to piece the backing than it does to piece any kind of block.

I didn't participate in Design Wall Monday last week because my wall was the same as the week before and I didn't think we needed more shots of the frog-quilt-in-progress.  But this week, a couple of blocks have joined the frog quilt top.  They are from my First Thursday Piecers Group (from now on referred to as "2011 BOM Group").

We are using this book. Because of another engagement, I skipped the meeting when it was decided.  It seems to be a pretty good book -- some of the blocks are easy and some more challenging.  Because the people in this group run the gamut from beginners to advanced, I think it's a good choice.   I like that this book contains a number of different layouts and instructions.

So I couldn't wait until next year (or until I finished this year's) and started a couple of blocks.  I'm still playing around with the background on the bottom two.

To see other design walls, click here to go to Judy's blog.

Wednesday, November 17, 2010

Some 'Splainin'

Or:  Here's where I croak out a mea culpa (sorry, I just couldn't resist).

It has come to my attention that my previous post was unclear.  I am currently blaming blogger because  it took forever for my pictures to load.  So long, that I almost gave up and deleted the whole thing.
But I didn't.  So now I have to explain myself.  The reason I didn't want to stitch the batting to the frog was mainly because I didn't want to have to cut away the excess.  I also didn't want that extra stitching around the edge because I had already stitched down the edges with this fancy stitch.
Here is a closer view -- I left the pictures large, so you can click on them for a closer view.  I didn't want to use the fancy stitch on the batting because I'm afraid that the needle or thread would have pulled the batting up onto the front.  And since I will be stitching around the frogs when I do the quilting, I didn't want too many lines of stitching around them.

One way to eliminate the excess stitching is to use water soluble thread, but that adds the step of rinsing and I didn't want to have to do that.
I finished all the frogs -- here is a picture of the whole quilt top on my design wall -- now it's ready to be layered and quilted.

Monday, November 15, 2010

Frogs, Stitches, and Trapunto

Today my design wall is on the machine.

I stitched around all the fused frogs, then decided to do a little trapunto with the threadwork.  Normally, when one does trapunto, a piece of batting is placed behind the shape and stitched around.  Then the excess batting has to be oh-so-carefully trimmed away.  And sad is the snipper who snips too close and cuts a hole in the quilt while removing the excess.

There has to be a better way.  Especially with these small frogs and their tiny appendages.  So I tried ironing my freezer paper shape to the batting -- I'm using wool for these --and then cutting it out.  This worked fine until I tried to remove my stencil from the batting -- it didn't want to let go.

So I settled for just cutting out a rough shape.  I sprayed the back of the frog/quilt lightly with temporary adhesive; then, using the stitches around the shape as a guide, I placed my piece of batting on the back of the frog.

From the front, I did my thread sketching, but I did not stitch around the edge of the frog.  I stitched only the parts that would give my frog depth.  I used a couple of different colors of thread and my freemotion foot.  I was careful to feel the batting underneath with my hand to make sure it stayed in place as I stitched.


Here is a view of the backside -- with no trimming necessary.

Flush with my success, I tried another.

I like this method a lot -- the only tricky thing is to make sure that the batting doesn't get pushed aside when doing the thread work.  I ironed the batting before I cut out the shapes -- the flatter it was, the easier it was to cut into the shapes.  Next, I'll finish the other three frogs, then layer and quilt as usual.  I will stitch around the edges of the frogs then and there won't be any threads to try to stitch on top of or to remove.

To see what other people are doing today on their design walls, click here to go to Judy's blog.

Monday, November 8, 2010

Frogs and More on Design Wall Monday

This is on my design wall today.  Off to the right are the frogs I did in the previous post.  This quilt is the result from last Thursday when I went to Monroe, Wisconsin, and met with the Very Friendly Ladies for a class taught by Klaudeen Hansen.

This is the pattern we did.   I love the sample quilt she made (I even offered to take it home with me and take very good care of it, but, sadly, no dice).  I think it looks more like a pond than pie, so I made some frogs to fuse to the top.   I tried it with the green in the center, but it looks better with blue.

To see more design walls, click here to go to Judy's blog.

Sunday, November 7, 2010

Frogs, Stencils, and Inks

I needed some frogs for a project I'm doing.  So I found some copyright-free pictures and traced them onto freezer paper.

I cut them out and ironed them to some lime green fabric.  I got out my Tsukineko inks and those Fantastix "coloring tools" and inked in the frogs.

Then I heat set the inks with a hot iron and added fusible to the back side.  I removed all the paper and cut them out with my favorite sharp scissors.  Here they are stuck to my design wall.  I think I'm going to need at least one more frog for this project.