Showing posts with label thread-painting. Show all posts

Friday, July 5, 2013

First Day Out With My New Foot


I have mostly finished the thread work on the tulips and Rosie.  I decided that some more traditional quilting in the background would be a nice change from all the intense threadwork on the rest of this quilt.

For quilting and thread-painting, I have been using the same foot I purchased with my sewing machine some ten years ago -- I can't believe it's been that long.  It's a clear circle and has worked pretty well up 'til now.  But I wanted to do some really tight quilting around these lovely feathers and I just couldn't see through the plastic well enough to do it.  


So I finally broke down and got an open darning foot.  Fortunately, I didn't just start right in on my Tulips and Rose quilt because it works very differently from my old foot.  I made up a sample with the same fabric and wool batting.  I used the blue washaway marker and drew some feathers.  


It took a bit of practice, but I have gotten the hang of it.  It's interesting (to me, anyway) that my freemotion feathers are better than the ones I did stitching along the lines I drew.

I'm linking up with FMQ Friday today.

Tuesday, May 14, 2013

Thread and Value of Samples


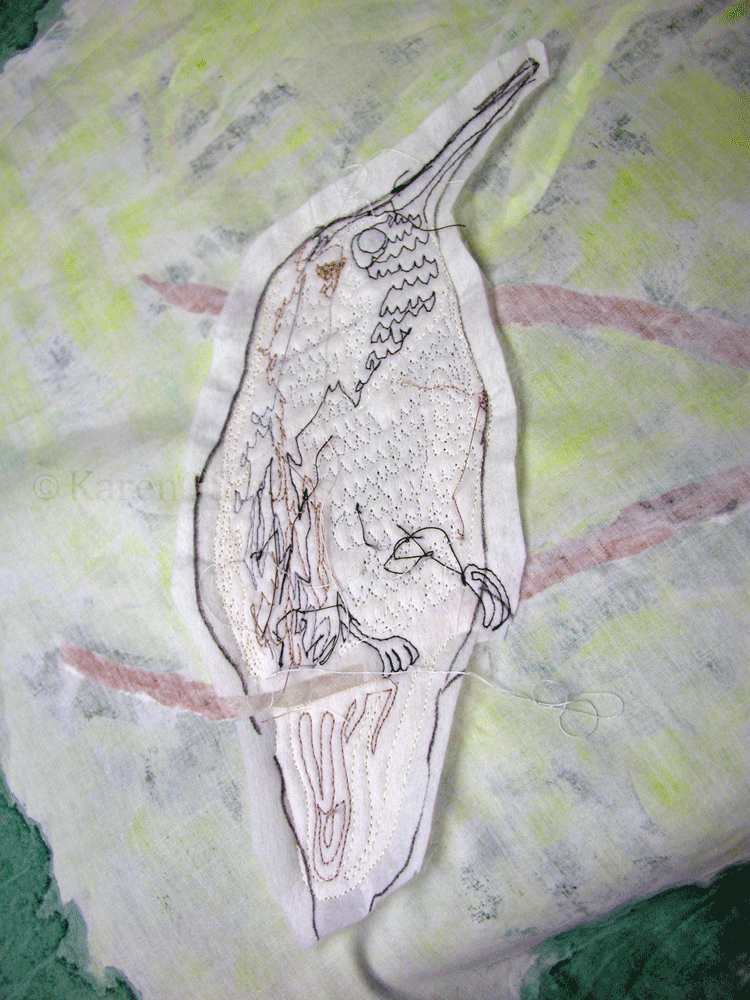
This is my first attempt at thread sketching.  I took a photo and traced an outline onto a piece of hand-dye from the "needs more" pile.

This is the back side -- I used a piece of Decor-Bond for stabilizer.  There are lots of issues with thread tension here -- I can't remember if it was the needle, tension, or just inexperience.  I used 50 wt Aurifil thread.


This is the self-portrait I did for Art Quilts Around the World.  I took a bit of Golden Threads paper and traced the outline from a photo with a Sharpie, then went over that with my machine.  I ripped off the paper and filled it in with more 50 wt Aurifil in gray.

I make samples for bigger pieces -- it's good to get the thread, needle, and tension issues out of the way on a sample.  For this one, I fused a piece of cotton on top of more cotton with a wool batt. I did exactly the same thing for my sample -- same fabrics, batt, and fusible web.  I auditioned the threads -- I had trouble deciding which colors to use and this made it much easier.


This is a detail shot of the pelican that shows the finished threadwork.  I'm not sure whether this qualifies as painting or sketching.

And this is another example of sketching/painting -- I used 50 wt thread for the trees and leaves in the background and 40 wt variegated quilting thread for the fused tree -- the dark brown one on the right.

The fused tree was done first with batting only, then I layered the whole piece and finished the background.  This way, the fused tree stuck out from the rest of the piece.

The owl was done separately by hand, then attached after I finished the rest of the piece.

Saturday, May 4, 2013

Thread Painting and Sketching Supplies


First, let's get the business of thread-painting out of the way.  I can tell you what I use, but I heartily encourage suggestions.

I like thin thread.  My favorite is Aurifil 50 weight.  I like it because it's thin, strong, and comes in any color I can dream.  My only problem with it is that it is in short supply in my small town and I have to acquire it at quilt shows or drive an hour or so to obtain it.  And I have done that drive.  More than once...  but I digress. And I do use other manufacturers and weights if I like the colors.   I like the thin thread because it's forgiving.  If I scribble-sew all over, mistakes aren't obvious.  With a thicker thread, it would be.  But thick thread has its place.  I like to cover things with thread because I think it gives an organic look.  My favorite subjects have hair or feathers.  But thick thread is really great for trees.  And for less organic things.

With my thin thread, I use small needles.  I like 75/11 or 80/12 sizes.  I usually use Schmetz jeans/denim or Microtex.  The shop where I purchased my machine suggested a new brand, Inspira.  I have been using their denim and Microtex and sometimes their titanium-coated needles and they seem to work pretty well- they're cheaper too.  I change my needles a lot.  When they make that popping noise, it's time for a change.  Sometimes I will notice nests or loops on the back -- time for a new or different needle.  I don't change my machine tension a lot after I make my sample.  Just the needle.  When using thicker thread, a larger needle is in order -- without a lot of blather about technical stuff, I suggest 90/14 Topstitch needles.

As for fabric, I use anything I can lay my hands on.  My favorite stuff to use is hand-dyed cotton, but I'm not proud.  I'll use anything that suits the project.


Which brings me to stabilizers.  I have been using Decor-Bond for a while now -- it's fairly lightweight and doesn't feel too crinkly inside of a quilted project.  A friend (thanks, Robbie) recommended Sulky Totally Stable recently, so I'm going to be experimenting with that this month.  I have a project that I abandoned because I didn't use any stabilizer before I started covering it with thread.  I'm going to see if I can reclaim it with stabilizer.

And don't forget feet:  I use my freemotion foot with the feed dogs down.  Sometimes I forget and leave them up -- I usually don't notice until I remove the piece.  So I'm not sure it's all that important.

Next: thread-sketching and the value of making samples

Wednesday, May 1, 2013

On the "...Fire" Blog: Thread Sketching and Painting

This month on the "...Fire" Blog, I'm "up."  And I choose thread sketching and painting.  Click here for the link.


I was at a quilt show a couple of years ago and in the little sign accompanying a certain quilt, one of the techniques given was "thread-painting."  My friend and I looked all over that quilt and didn't see anything we thought would qualify as thread-painting.  It was a modern art quilt, composed of beautiful hand-dyed fabrics and artfully quilted, but we just didn't see any actual thread-painting.

I am not enough full of myself to think that I can provide the definitive definition of thread-painting, but I think that a lot of what I do qualifies as such.  So this month, my month, I want to explore the art of painting on fabric with thread.  Because it's really just another form of my favorite thing: putting color on fabric.

Here are a couple of examples to get the creative juices flowing:

Ellen Anne Eddy does amazing thread work.  Her website is here: http://www.ellenanneeddy.com/
and her blog is here: http://www.ellenanneeddy.com/weblog/

Terry Aske has a nice portrait of a thread-painted dog here:
http://www.terryaskeartquilts.com/Studio/2013/04/13/on-my-design-wall-dog-portrait-finished-2013-04-13/

Shannon Conley has a nice thread-painted dog here:
 http://imworkingonaproject.blogspot.com/2013/04/woof-woof-dogs-are-out.html

and for those who are not necessarily fans of dogs, Quilting Arts is offering a free ebook on thread painting and sketching here:
http://www.quiltingdaily.com/blogs/quilting-daily/archive/2013/04/25/thread-sketching-and-thread-painting-new-free-ebook.aspx


Next up: the basics.  Threads, needles, fabrics and stabilizers, oh my...

Sunday, March 31, 2013

Let the Wild Rumpus Begin!


"Party Animalz"

11.5" by 16.5"

Inked and thread-painted, hand-dyes, acrylic paint, beads and assorted trims, machine stitched and quilted

Today is reveal day for the carnival challenge at Art Quilts Around the World.

I was inspired by a news story that showed a parade of pets during Carnival in Rio de Janeiro this year.  I tried to think of what kind of dogs would be fun at a party and I chose Jack Russell terriers because they seem like such high-spirited dogs.

And I thought they might enjoy the hats.  The hats are fused hand-dyes with machine stitched accents and hand-beading.  I challenged myself to use only stuff I already had and I was delighted to find this quilting thread in my stash that perfectly complemented the hand-dyed background.

Friday, March 15, 2013

Gone to the Dogz


I need some dogs for something I'm working on.  I took a photo of Rosie and inked it onto some cotton fabric with fabric Sharpies and Tsukineko inks -- sorry -- I didn't take a picture.  I layered the inked image with wool batting and used Decor-Bond on the back to make it stable, then I stitched all over it with my machine.  I did iron the sandwich to make it flat before I stitched -- and I had to hit it again with the iron to flatten it after the stitching.


I drew up some Jack Russell Terriers to keep Rosie company and did the same layering thing with batt and stabilizer.  I found some great variegated greys among my stash of Aurifil threads -- those would be the two grey ones on the right side of the photo.  These are all 50w spools.

Then I covered the little terriers with thread.

I am linking up with Nina-Marie at Off the Wall Fridays.

Thursday, January 31, 2013

Self Portrait Reveal

Today is the big reveal over at Art Quilts Around the World.

Here is the back of mine for those who are interested.

You'll have to click here to see the front.


Wednesday, September 26, 2012

Hummer Progress


I finished the painting part of my interpretation of Statia Dougherty's wonderful hummingbird photo.

I really like these paints from Prochem.  They behave like Setacolors (long my faves), but I think the colors might be brighter and more intense.  They're cheaper too and since I can no longer obtain Setacolors locally, I have to do mail order.  The only thing I don't like is the little jars they come in.  I made a bit of a mess pouring them on my palette.


I wanted the hummer to stand out from the rest of the quilt, so I added wool batting and stabilizer (I used DecorBond by Pellon).  Then I added thread.  I used 50 weight Aurifil.


For Beth: here is the back side of the bird after adding the thread.  No, I didn't trim the threads very well.

I left a bit of the stabilizer extending beyond the edge of the bird so that it would get caught in the quilting and make the bird stable.

And here is the finished hummingbird before I layered and quilted the rest. 

Thursday, May 24, 2012

AB-liqué Research, Ohhhh Myyyyyy...

I had to do a little research to get it right.  I've detailed my efforts to buff up Poseidon with inks and thread in previous posts and I wanted his abs to match the rest of his physique -- at least the parts not covered up by his clamshell-chariot.

Abdominal muscles
So I went online and searched for some images to use as a guide.

Some of the images were a bit more graphic than I was looking for.

But a couple were just right.


So here is Poseidon with his trident and the clamshell-chariot covering his pertinent parts -- the fresco I took my inspiration from had him riding in the buff (ha!) with waves providing camouflage.  But I didn't want to take a chance on the water draining away and exposing anything that might scare the youngsters.


I'm not thrilled with the way the fused fabric shows the lines from the seams underneath.  Next time, I will be sure to cut away the underneath.  It's not as bad as it looks in this photo.  Does anyone have any suggestions for making it less noticeable?


And for Beth, the backside.  

I'm linking up with Angie's blog -- click here to see other appliqué projects.

Tuesday, January 11, 2011

January Journal Quilt

"Repeat Eyes Her Dinner"
8 x 12 inches

This is my first completed Journal Quilt for 2011.  My personal challenge was to use some of my shibori-dyed fabric.  

So I used the stuff with the little moons because geckos are nocturnal.  

I stenciled little gecko shapes with freezer paper templates and sponged the paint onto the fabric.  It's pretty subtle.  Not what I intended, but after it dried, I liked the "ghost-gecko" look.  I left the pictures pretty large, so you can click on them for a better look.

The gecko and cricket are raw-edge appliquéd with textile paint and thread to enhance them.  

I chose the leopard fabric for her top side because she is a leopard gecko.

The sand is more paint and thread.


What would I do different? Another of my self-imposed rules was to make each journal quilt 8.5 by 11 inches.  I chose this size because it's large enough to really try a technique -- but not so big that I won't have time to finish.  This one missed that rule -- and actually, I think it looks unbalanced.  I think it needs another border on the side.  

I had wanted the gecko to dominate the quilt, but with the top and bottom borders, it just doesn't work for me.  I think I could have done without the borders and made the gecko larger, but then I wouldn't have used the shibori.  So maybe I need to make another one...


Friday, September 3, 2010

Flora is Finished (Maybe)

"Flora Checks In"
21" X 23"

Turned edge appliqué, raw edge appliqué, thread painting, Tsukineko inks, commercial cottons, hand-dyed cottons, cotton thread, and wool batting.

I'm trying to decide if the flowers need some stems.  It's not "due" for another week and a half, so I may just add some.  And I can see now that the butterfly needs some antennae. Hmmm...


I created this for the Olbrich Gardens Quilt Challenge, 2010 Fall Show, "Quilts in Bloom" in Madison, Wisconsin.  It will be on display from September 25 through October 17 with the other challenge pieces and 40 other quilts, each featuring a botanical theme.  They will be displayed in a lush indoor garden created especially for this show.  It is always spectacular.

This is a picture from last year's show -- that's my quilt on the left, "Rainbow Garden."


There is a Viewer's Choice award, so if you're in town, please stop by, enjoy all the quilts, and vote for "Flora."  The prize is a year's membership to Olbrich Botanical Gardens.  I won this prize in 2008 with "Forest Faeries."    I'd love to win again.

Sunday, May 16, 2010

The Trouble


with dyeing and painting my own fabric is that it gives me too many choices.  I started dyeing and painting my own fabric because I was never happy with all the choices available at the store, but now I have too many.  Go figure.  Of course, sometimes I get so caught up in the whole color thing I forget that I'm supposed to actually do something with the fabric.  Sheeesh.   I think that having fewer choices makes me be more creative.  But then, there is a lot of creativity involved in putting color on fabric.  Hmmm...

I have figured out how to make a collage in PhotoShop.  Cool, huh?

So which background did I choose?  Um, well -- none of the above.  Yep, I overdyed one that was similar to one of the above for something completely different.  It figures.

Below are the threads I have chosen -- sometimes it's hard when you see so many shades of grey...


But now it's time to stop agonizing and just do it.

"Nothing encourages creativity like the chance to fall flat on one's face."  
~James D. Finley, Textile Executive, 1917 - 2003

Tuesday, December 8, 2009

Bird's the Word

OK -- the title has nothing to do with anything except that this song was in my head while I composed this post. I have been procrastinating on my Rust-Tex quilt because I couldn't decide whether I should put more thread on the wing. I tried some fancy stitches on my machine and decided that a feather stitch (oh yeah) set with almost a satin stitch length would give the wing nice texture. I tried out a couple of different rayon threads: one a variegated black and silver, but the colors didn't change often enough and I got the results below:I didn't like the dark gray, so I went with black.
You can click on the pictures to see them even closer.

Saturday, November 7, 2009

Preview of Rust-Tex Quilt

Yesterday, I took a day off from work and played in my studio. I started working on a quilt for the Rust-tex collection (which is here). Here is a sketch:I'm playing with proportions using a Fibonacci sequence ( 0, 1, 1, 2, 3, 5, 8, 13, 21, 34, etc.) where each number in the sequence is the sum of the two numbers immediately preceding it. I'm not using all the numbers (wink), just the ones that interest me...
These are the fabrics I'm using. There are hand-dyes (the blue sky and pieced greens), a shibori-dyed brown on the left and the two Rust-Tex pieces on the bottom right.

Rust-Tex is fabric dyed using actual rusted stuff by my friend and fellow MCFA member, Lois Jarvis. There's a much more complete discussion of how she does it on her website (which is here).
So I needed a bird and I chose a crow (or maybe it's a raven) from a copyright-free Dover illustration. I drew it on a piece of black cotton sateen with my beloved Bohin mechanical chalk pencil (thank you, Beth). I backed it with a piece of black fusible non-woven interfacing to stabilize it for the threadwork.
I thread-painted the body and head of the bird with black rayon thread -- I used rayon because it's shiny. I just thread-sketched the feathers of the wings -- I haven't decided if I'm going to use more thread on them.
I painted the eye with black fabric paint, then used raw sienna paint around the black circle (note to self: next time paint first, then thread -- it's too hard to see the black paint with all that shiny black thread). I sketched a circle of orange rayon thread around the eye and used opaque white paint to highlight.
The working title for this piece is "Seasons of Wisconsin" -- I know, that's booooring, but as I said, it's a "working" title.